1. This pattern is from a super generous, creative woman named Sharon Sigmon who shared it with a Facebook T@b group. The instructions will be posted at the end of my post. If you use them, send a shout out to Sharon!
2. I. Don't. Sew. All success of the sewing part of this project goes to my friend Michelle who has mad skills!
It all began when I really started researching T@b campers in 2016 and discovered lots of them had these adorable awnings that somehow made the campers even cuter. Then we went and bought a camper, and I couldn't stand not having one as cute as possible, so I wanted those awnings! I started working on Michelle by showing her pictures and talking up the need for these cute window coverings, and she FINALLY suggested she could help make them. It's almost like I should have just asked her, but this way it was her idea, and I could jump into the project guilt free.
I read and printed the instructions, read them again, gleamed about a 30% understanding, and brought them to Michelle. I ordered outdoor fabric in two patterns to make the awnings reversible. In my mind, this made them versatile and unique.
In reality, I chose two patterns that had to be carefully cut to remain straight, and were stark enough in contrast that we could see through one fabric to the pattern on the next fabric.
Sigh. This led to me searching out a liner fabric, one that could get wet if left on in the rain, but not as expensive as the patterned outdoor fabric because budget.
After a trip to JoAnn Fabrics and a customer service experience of hell, I got the fabric and brought it back to Michelle. Then the plotting and planning began...
This is where I discovered that Michelle is a "wing it" kind of gal when it comes to sewing. Don't get me wrong, I was super appreciative of this as it took the stress off of me for being kinda clueless as to what we needed to do. She sort of shrugged and figured it would all work out in the end.
We used her craft room floor as our fabric table. This worked great!
You can see we had plenty of room to spread out the fabric, measure, and make cuts. But then...
She said, "You need to do the cutting since I'm doing the sewing." What? this was NOT in the plan! One thing she knew about me and shrugged off as insignificant was the fact that I have never cut a straight line ever. EVER. Even with a straight edged cutter. I embrace this flaw, but wasn't too excited about it entering my awning project. This called for more tools:
That's right. I broke out the wine. After much fretting, I made the cuts. Several of them, in fact, before reinforcements were sent in.
(How long did we really expect the cats to stay away?) Thanks to Sasha for her help!
Here I am cutting the lining to go between the two patterns. I'm all kinds of confident now!
I wanted the bottom of the awning to have a scalloped border, so we used a lid to a coffee can to trace the pattern, and I cut it out. Michelle pinned it all together, then started sewing like it was no big deal. This girl was cool as a cucumber, I'm telling you.
This was our first one, as she turned it right side out. While she sewed, she removed the pins and put them into her little pin tomato. I helped. (Maybe the wine helped?)
I made an alien pin tomato!
Next, while she worked on the second awning, my job was to poke out all the tight corner seams from the inside so that the corners and scallops would be as flat as possible.
Next, we had to add elastic and strips of fabric with velcro. This is how the awnings would attach to the windows.
Michelle used leftover strips of the lining fabric to make the strips we would attach the velcro to. I had purchased the velcro ahead of time, and was thrilled to see it was a "No Mess" process!
With an eye roll, Michelle showed me what the velcro really was...
Oh.
Did I mention I don't sew? Did I also mention I'm very grateful for Michelle? 😀
So, we finished in like 3 days, 22 hours, 47 minutes or something, and WOW! These little darlings were absolutely perfect! Take a look at the finished project, and try not to swoon.
Yellow striped side.
Gray chevron side.
Well, is that not just adorable? I was thrilled with how they turned out and couldn't WAIT to use them! Look for them in future posts, and send Michelle some love and understanding for helping me with these. I learned a lot from the project and will probably be less annoying on the next one. Maybe.
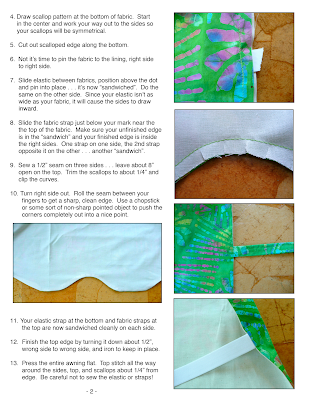
As promised, the instructions for these cuties!
Happy camping and crafting!
Peggy


Super cute! Love hearing about your adventures.
ReplyDeleteThanks, Amanda! Next post will be an adventure for sure. :)
DeleteThese are absolutely darling! Michelle is a saint. A very talented saint.
ReplyDeleteShe is SUCH a good sport. I think I owe her one. :)
Delete