Tuesday, August 2, 2016

Organizing Our Camper

I might be a bit of a nerd, but I love to organize. Garages, craft rooms, kitchens, linen cabinets...and now...our T@B! The minute we placed our order for the T@B, I began scouring the interwebs to look at pictures of the cabinets, bench storage spots, and any other area I thought might be useful for storing stuff. I even joined a T@B forum to ask questions and see if anyone would take some measurements. I may have been a little obsessed, but it paid off! When the B@R T@B arrived, I was stocked with lots of organizers and containers to maximize my space. Tour time:


This handy little hanger solved two problems for me. One, the bathroom door isn't very private, and it's directly across the camper from the door, so I thought it might be a good idea to hang something on it, and two, it gave us storage for our beach towels. If you're looking for an organizer like this, I ordered it from amazon.com for $12.99, and that link should take you right to it.

Next I'll move to the cabinets above the front bench where I stored our toiletries.


This is still a work in progress, but up here I have two rolls of RV safe TP, facial cleanser, toothbrushes and toothpaste, sunscreen, and a few other bits and things.


In the right hand cabinet, I put these awesome yellow storage boxes that I found at our local thrift store for $1 each. In them I organized annoying but necessary little items like a sewing kit, laundry supplies, and hygiene items. I also fit in two emergency rain ponchos, wet wipes, a laundry bag and our microfiber bath towels. There's a lot in that little space!

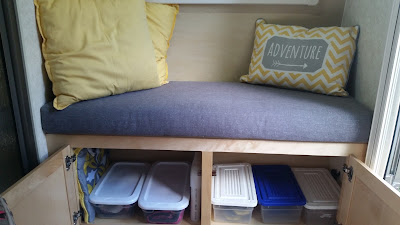
The bench below these cabinets also has storage, left side for me, right side for Andy!


As of now, we have some plastic shoe boxes in each side containing items we want to always have in the camper (sweatpants, extra socks, blankets, etc.) and lots of space on top of those to store our clothes for each trip.


I like the idea of the boxes (my side here, with a picnic blanket stored on the left), but I think that they're taking up too much room for me for the storage area they provide, so I may make some changes shortly. Andy, however, likes his side:


Moving to the back of the camper, there are three cabinets, and two pass through to the kitchen area:


This cabinet is on the back of the outside TV, so it's the only one that doesn't pass through to the kitchen. In it we put a first aid kit, tissues, more sunscreen, bug spray, more wet wipes, paper towels, and some staple can foods.


The middle cabinet has some of the canned foods, potato chips (The Lays Stacks fit perfectly, and stay fresh!) pasta, rice, grains, crackers, graham crackers, and Belvita granola bars, our favorite!  By using some plastic containers from Walmart, I was able to fit a lot of irregular shaped containers in, as well as manage to keep them fresh and away from bugs and rodents.


The right hand cabinet has so much food, we will probably never starve! K-cups for my mini-Keurig coffee machine, ground coffee for our French press coffee maker, salsa cups, spices, condiments, popcorn, snacks, dried fruit, and granola. I used my label maker to label all the containers so it would be easy to see what was inside. I also took the time to duplicate the labels and place them on the kitchen side as well:


No matter which side I'm accessing from, I can see what I am looking for. The kitchen has a large cabinet to the left of the fridge where I put all of our dishes, mugs, etc:


We have service for 6, plates and bowls. I also have a stack of Chinet compostable plates, four coffee mugs, the French press, a cocktail shaker, 2 water bottles, 3 collapsible bowls, 3 cutting boards, two wine glasses, 4 reusable plastic tumblers, and several Solo cups. I also have our oven mitt and potholder in there, and most of it is easily accessible due to a wire add-on shelf on the bottom. It took some trial and error, but I'm really happy with how it turned out, and it travels very well. When we arrive and we open up the kitchen, everything is still in its place!

The last kitchen area is still my work in progress, the area under the sink and stove:


There is quite a bit of stuff in here, I just hate how it looks. I have to be careful on the left side, under the sink, because there are a LOT of water pipes under there, and I don't want to put anything on them that might squish them and damage them or make them not work correctly. As I have it now, my Clorox Wipes, soap, sponge, paper towels, towels, and dish draining pad are tucked in here and there in the spots between the pipes. I used two magazine organizers to vertically hold baggies, tin foil, garbage bags, and plastic grocery bags. On the far right, I have 3 cast iron skillets of differing sizes, a dutch oven, and saucepan. That all fits really well, and is easy to get to. While we travel, I also put my utensil crock, collapsible trash can, solar light, and an ice tea pitcher, then when we arrive, I place those items where I need them for our stay!

Thanks for checking out this post, too! My next story to share is our first camping excursion! Not only does it give you some fun info about the T@B, it gives you a great resource for a fabulous campsite in Wisconsin...it's even near a cheese factory! YES!

Happy Camping!
Peggy


T@B Tour

As promised, today I'm sharing with you the features and layout of this awesome camper, "The B@R T@B!"

Let's start with the model we chose, the CS-S. This stands for "Clam Shell-Shower," meaning the back opens up like a clam shell, and the interior has a wetbath. Yes. All of that fits in this little gizmo!

Here's a pretty pic I took when we first arrived at the dealer:


How cute is this?! The trailer length, from front to back, is right at 15 feet, so I believe the actual unit is 12 feet long, and just about 6 feet wide. Talk about a tiny house, huh?

As I mentioned before, this is the clam shell model, so the kitchen is in the back, and the back opens up, much like the hatchback of a car to reveal this:


OK, my decorating elves had already gotten to the kitchen by the time I took a pic, but there is a sink, stove, mini fridge, TV, external speakers, cabinets and drawer, all ready to go when we arrive at our camping spot. Little to no setup required. Here's a second view, to help put it all together:


Now let's get to the inside. As I said above, this model has a shower/wetbath. It's not luxury by any means, but it does the job required! Take a look:


Somewhat tiny, eh? It's big enough to have its own window though! ;) Here's a different angle, showing the wee little sink you see most of above:


You see? A mirror, shower, sink...everything I need to get clean! Now, unfortunately, this is not a "tall" area in the camper. I uh...have to sit down to shower, but it does work, even if it's a little weird to get used to!

The T@B also has 3 benches for sitting, and a small adjustable/removable table and mount. The table removes, and two of the benches fold down to create a bed that's slightly wider than a full, and not quite as big as a queen. We chose an upgrade for our fabric and went with the Outback model's gray interior. We thought it was a lovely color (totally matched my yellow/gray color scheme!) and was not as offensive as the stock geometric pattern choices. (Probably important to note that without my dealer's input, I wouldn't have known I had the option for upgrades like this one. If you're looking at ordering one, make sure to ask what might be available to fit your needs and taste.)


(We'll talk about the cabinets later.) These are actually very comfortable to sit in, and when folded down as a bed, comfy to sleep on! 


The only drawbacks we see so far is that it is only 70 inches long, so tall people may not find it too comfortable, and one person is on the inside, meaning if they want to get up, they have to crawl over the person sleeping on the outside. We do OK. I'm 5'8", and Andy is 6', so we sleep a little at an angle to give him a little more room, and it's working well. 

We're not done yet! This particular model also has a bench with storage at the front of the camper!


Please ignore the messy stuff sitting there. This is great for additional storage and seating, especially if you have any visitors that want to peek in and take look. There is room for 4 people to sit comfortably, and maybe 5 people who know and like each other, and possibly 6 people who were really, really, REALLY good friends. :)

I hope I've done justice to give you a clear view of what it looks like. For my next post, I'll open up all the doors and drawers and show you how I used them. I'm pretty amazed that with a little organization and planning, you really can fit an awful lot of good stuff in here!

Happy Camping!
Peggy


Thursday, July 21, 2016

Welcome, Campers!

I'll get right to it: You have just discovered the blog of a new crazy camping lady (Peggy), married to a slightly less crazy camping man (Andy). Here, so you know who we are:


While we're not new to the camping scene, (we've been tent camping for years) we recently purchased a brand new custom T@B camper, so we are fresh faces in the travel trailer world, and this blog will be all about our adventures and lessons in mini RV camping.

The T@B is an adorable teardrop shaped camper, produced by Pleasant Valley and Little Guy Trailers. You can look them up here. Go ahead and look. If you're anything like us, you'll look for about 6 years before committing to one. ;)

In 2009, we were on a vacation in Wisconsin when we saw a small teardrop camper at a dealer (across the street from a cheese shop!) and we loved it! Look how adorable it is! (Andy too.)


This started our obsession with teardrop-style campers. Two years after promising each other that we would one day own a darling unit like this one, we saw a video on YouTube that introduced us to the larger T@B model you can see here. This was a game changer! We loved the efficient use of space and the fact that we could stand up in the camper, so we promised each other that we would one day own a darling unit like THAT one. 

FIVE YEARS after promising each other that we would one day own a darling T@B, we decided to buy one. Just. Like. That.

By this time, there had been many updates and changes to the T@B model, and many options were available that weren't there in 2011. One of the options that suited our needs was the "clamshell" (CS-S) model. This model reminded us of the original Little Guy Trailer we fell in love with in 2009. The kitchen is on the outside, and the back opens up like a clamshell to reveal it. It also contains a shower and commode inside! While I wasn't really excited about the toilet option, the idea of an interior shower was appealing. No more walking across the campgrounds to shower in the public showers in my flip-flops!

Through a lengthy google search, I found a unit we both liked at a great price, just 4 1/2 hours away at Prestige RV & Auto in Chippewa Falls, WI, the only drawback was it was white with red trim...not my favorite, but it was just color, right? I called and spoke with Chris, the salesman, and briefly discussed the trailer with him. He was with another customer, so we cut the conversation short, and I promised to call him back. Later that night, I brought up the website to show my friend, Michelle, and the unit was no longer pictured! :( We had finally decided to buy one, and the one I wanted was gone?! Grrr...I emailed Chris to find out what happened, and included my phone number for him to call me back.

He called the next morning, and informed me that the camper had sold. I was terribly bummed, but figured I'd keep looking. He then said that he had just placed his order for four new units to be delivered in July, and if I let him know the colors and options I wanted, he could custom order one for us. Well then...

We ordered a CS-S Max, silver with yellow trim, and upgraded interior fabric to the Outback model's gray fabric. We also included the front window option, bathroom portal window, exterior shower, and new Lagun model table inside, with an outside mount as well. Then the long two month wait took place.

Sigh...

Is it July yet?

Don't worry, I kept myself busy and distracted by buying a TON of stuff for this thing! I decided everything should coordinate with my gray/yellow color scheme so... this happened.


This is just part of the sunshiney goodness that entered our T@B. The flamingos were perhaps an impulse buy... that were painted yellow to match...LOL!

Anyway, the long wait, the planning, preparation, and dreaming finally became a reality on July 10th as we drove to Wisconsin to pick up our new baby, "The B@R T@B!"


Isn't it a beauty? In my next post, I'll take you on a tour, inside and out, and show you what this thing has got!

Thanks for sticking with me to the end of the post. You must really have been interested, or you're a really good friend. :)

Happy Camping!
Peggy